Email Setup on Your Android Phone
Tuesday, May 10, 2016
EMAIL ACCOUNT SETUP IN MAC MAIL (SMTP/IMAP/POP3)
This tutorial shows
you how to set up Apple Mail to work with your Private Email email
account. We will use a test email account example@nctest.com to show you what
to do. Before proceeding with the Apple Mail setup, you need to make sure that you
have created a mailbox.
In order to set up
your Apple Mail, follow the steps below:
1. From the Mail menu, select Preferences:

2. Go to the Accounts tab, and then click on + at the bottom of the Accounts box:

3. In the Add Account window, enter your name, full email address and password for. Once done, click on Continue:

4. In the Incoming Mail Server screen, select POP or IMAP from the Account Type list and enter your details as follows:
Description: the name of your account
Incoming mail server (POP or IMAP): mail.privateemail.com
User Name: full email address
Password: password for your email account
Click Continue to proceed. 

6. In the Outgoing Mail Server screen, enter your details as follows:
Description: the name of this mail server
Outgoing mail server: mail.privateemail.com (same as incoming)
Use only this server: should be checked
Use Authentication: should be checked
User Name: full email address
Password: password for your email account
Click Continue once filled: 
7. You will see Account Summary with all your details. Check Take Account Online box and click Create:

8. When you create and send your first email, a message saying Change prefix to INBOX appears. Set to Don't change. Once your account has been created, you will be able to choose additional settings for IMAP or POP3 incoming/outgoing server. 9. For outgoing server (SMTP), click on your account under Accounts. In Account Information find Outgoing Mail Server (SMTP) field and then select Edit SMTP server list option:

10. Here you can set the server and specify the port: Outgoing server (SMTP): port 465 with SSL Use Secure Sockets Layer (SSL): should be checked

11. For incoming server (IMAP/POP) click on your account under Accounts and go to Advanced tab. For IMAP use the following settings:
Port: port 993 with SSL, or 143 without SSL
Use SSL: select it when applicable
Authentication: set to Password
For POP3 protocol use the following settings:
Port: port 995 with SSL, or 110 without SSL
Use SSL: select it when applicable
Authentication: set to Password

That's it!
Monday, May 9, 2016
HOW TO SET UP EMAIL ON YOUR ANDROID DEVICE ?

Email account setup on Android 5.x.x (Lollipop) (SMTP/IMAP/POP3)
To set up Private Email account via IMAP/POP3/SMTP protocols,
do the following:
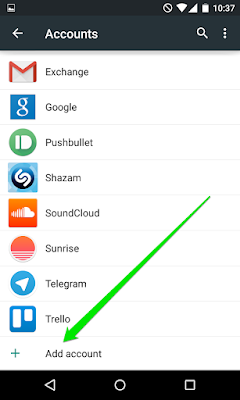
- Open Settings of
your Android device and tap on Accounts menu
in section Personal:

- Tap on Add Account at
the very bottom of the screen:
- On the next screen you will need to choose whether you wish
to configure IMAP or POP3 account. Simply
choose the desired option by tapping on Personal (IMAP) or Personal (POP3) correspondingly. Don't know about

- The next screen will prompt you to enter your email
address.Make sure to type in full Private Email address:

- Once done, tap Next to proceed to the next step.
- Here you
will need to indicate your email account password.

- Here you will need need to type in correct IMAP/POP3 settings
depending on the option you choose.Make sure
to use the following settings for IMAP: Username: full
email address Password: password
for this mailbox Server: mail.privateemail.com IMAP
Port: 993 Security
Type: SSL/TLS (Accept All certificates)

- If you decided to use POP3 protocol,
the following settings should be indicated: Username: full
email address Password: password
for this mailbox Server: mail.privateemail.com POP3
Port: 995 Security
Type: SSL/TLS
(Accept All certificates)

- Once done, tap Next to verify the settings and proceed to Outgoing Server settings menu.
- Here you will need to fill in the corresponding
fields as shown below: SMTP
Server: mail.privateemail.com Port: 465 Security
Type: SSL/TLS
(Accept All certificates) Username: full
email address Password: password
for this mailbox

- Once ready, tap Next to
verify SMTP settings and finish the account setup:


That's it!
HOW TO SET UP EMAIL ON OUTLOOK (VIDEO)
Watch this video to learn how to set up email on Outlook.
HOW TO SET UP EMAIL ON YOUR IOS DEVICE (VIDEO)
Watch this video to learn how to set up email on your iOS device.
Saturday, May 7, 2016
EMAIL PROTOCOLS

All
email services provided different companies may be accessible through webmail
or an email client such as Microsoft Outlook or Apple Mail. This article will get you familiar with some of
the basics of configuring email for an email client and provide information on
accessing your email via a web browser.
Email Protocols
How POP works
POP
(Post Office Protocol) is the older of the two methods for mail retrieval. In
the most basic sense, POP simply grabs emails from your server and downloads
them to your email client.When using POP,
emails are deleted from the server and will not be available if you attempt to
access your mail from another email client or webmail. Some email clients offer
a feature to leave a copy on the server. We have seen many email issues from
this feature being used improperly. If you decide to use POP, you can still view
these messages using the webmail client for your service.
How IMAP works
IMAP
is the preferred method of connecting to your email server. It simply displays
the contents of your mailbox as they appear on your server. Also, by default,
spam folders are configured to be IMAP-Only, meaning you will need to use an
IMAP connection in order to view and delete messages. Once again, we recommend
using an IMAP connection to both keep an eye on your Spam folder, and to make
sure you don't download email from your server that you would like to read
elsewhere.
Email Security
Many
customers travel and want to securely check their email from various locations
such as a wireless hotspot. For these customers, we offer the ability to use a
SSL (Secure Sockets Layer) connection. This will allow any email client to
connect to your email service over an encrypted connection. We
encourage all of our customers to use a secure connection when possible.
Email Port Numbers
We
use the standard email ports for all of our services. Below is a list of these
commonly used ports:
Incoming Connections
- IMAP,
non-SSL: 143
- IMAP,
SSL: 993
- POP,
non-SSL: 110
- POP,
SSL: 995
Outgoing SMTP Connections
- SSL: 465
- non-SSL: 25 (or 587)
EMAIL INFORMATION
The
following will show you the information needed to configure an email client to
use your (mt) Media Temple provided email. We encourage secure connections, so
the following information is provided assuming you are making a secure IMAP
connection with SSL.
Incoming Mail Server
Your
incoming mail server:
- Example: xxx.xxx.xxx.xxx
- Your incoming mail server is the IP address for your server which can be found in your Server Guide.
Incoming Port
We
are making a SSL connection use port 993.
- Example: 993
Incoming SSL
We
are making a secure connection so make sure SSL is enabled for your incoming
mail settings.
- Example: Yes, SSL Enabled
Username
The
username is going to be the full email address which you or the account owner
created.
- Example: username@example.com
Password
The
password is set within the Plesk Control Panel. Be sure to use a strong
password, and change it regularly. If you need to change your password, please
do the following:
Outgoing Mail Server
Your
outgoing mail server:
- Example: xxx.xxx.xxx.xxx
Your outgoing mail server is the IP address for your server which can be found in your Server Guide.
Outgoing Port (SMTP)
Your outgoing port numbers may need to be set manually. Since we are using a secure connection, you will use port 465.
- Example: 465
Outgoing SSL
We are making a secure connection so you will want to make sure SSL or TLS is enabled for your outgoing mail settings, just as you did for the incoming settings.
- Example: Yes, SSL Enabled
HOW CAN I SET UP EMAIL IN OUTLOOK?

This article is
provided as a courtesy to our customers to help you configure your Outlook
software to work with Email ID. Before you start, you'll need the
following:
- Your email address: user@example.com
- Your email password.
- Choose IMAP or POP - Please see the Using Email article for more details. Choose IMAP if you want to check the account on multiple computers or mobile devices. POP downloads the messages locally to your computer/device.
CONFIGURE OUTLOOK 2010
1.
Open Outlook 2010.
2.
Click File, then Add Account. See Figure 1 below.

Figure
1: Click the "+Add Account" button to begin.
Enter
your full email address and password. Outlook should automatically configure
your account for you. If not, proceed to the next section.
Manually configure Outlook 2010
1.
Open Outlook 2010.
2.
Click File, then Add Account. See Figure 1 below.

Figure
1: Click the "+Add Account" button to begin.
3.
Next, select Manually configure server settings or additional server types,
then click Next. See Figure 2 below.

Figure
2: This will allow you to enter your account information.
4.
In this screen, choose Internet E-mail, then click Next. Figure 3 below illustrates this window.

Figure
3: Be sure to select "Internet E-mail" then click the
"Next" button.
5.
This window is where you enter your email information, see Figure 4 below.

Figure
4: Enter your email account information in this window.
- Enter Your Name as
you want it to appear.
- Enter your full email address
username@example.com in the Email address: field.
- Select POP3 or IMAP. Learn more about the differences here.
- Enter mail.example.com in the Incoming
mail (POP3, IMAP) server: field.
- Enter mail.example.com in the Outgoing
mail (SMTP) server: field. To avoid common authentication issues with
Outlook, we strongly advise using SSL and port 465 for SMTP connections.
- Enter your full email address,
username@example.com, in the User Name field.
- Enter your email password in
the Password: field.
6.
Perform the following steps:
- Click on More Settings... see
Figure 5 for the location of this button.


Figure
5: This will open a new window.
- Click on the Outgoing
Server tab. Check My outgoing server (SMTP) Requires
Authentication. Make sure Use same setting as my incoming mail server is
also checked. Click on OK. See Figure 6 as reference.


Figure
6: Be sure to confirm these settings.
7.
Click the Test Account Settings button and you should see all items
with green check marks... Click the Close Button to close the test window.
Click OK to save your settings.
Click OK to save your settings.
Congratulations.
You have finished the setup of your email account. Click Finish to
close the setup wizard.
Subscribe to:
Posts (Atom)